- Is Checkout Field Editor compatible with REST API?
Ans: Yes, the Checkout Field Editor plugin offers REST API compatibility. It expands the functionality of your store and provides the custom field data in the REST API end-points. - How to get the value of a custom field in PHP code?
The fields created using our plugin are saved in the wp_postmeta table. You can retrieve the value of the custom field from the database by using the below function.
$order_meta = get_post_meta( $order_id, $field_name, true );
-
Trying to edit a field but the plugin settings page appears to be broken. How to solve this issue?
Please add the below code snippet in your theme’s functions.php file to resolve the issue.
add_action( 'admin_head', 'th5re3_header_admin_action' );

function th5re3_header_admin_action(){

$currentScreen = get_current_screen();

if( $currentScreen->id === "woocommerce_page_th_checkout_field_editor_pro" ) {

// Run some code, only on the admin page

?>

<style>

*, *::after, *::before {

-webkit-box-sizing: content-box;

box-sizing: content-box;

}

</style>

<?php

}

} -
When not being able to select the products from the field inside the Display Rules tab?
Please add the below code snippet in your theme’s functions.php file to resolve the issue.
add_action('admin_head', 'th123ovr_override_style');

function th123ovr_override_style() {
echo '<style>
.select2-container {
z-index: 999999999999!important;
}
</style>';
}
The fields are not functioning as Required fields in the checkout page even though making them as required in the back end.

Please verify after enabling the option “Enable required validation override for address fields.” in the “Locale override settings” inside the plugin’s Advanced Settings tab.-
How to change the first day of the date picker field to Monday?
You can use the below hook in your theme's functions.php in order to set Monday as the first day of the week on the calendar.
function thwcfe_date_picker_first_day($day, $name){

return 1;

}
add_filter('thwcfe_date_picker_first_day', 'thwcfe_date_picker_first_day', 10, 2); -
How can I add a new checkbox with a link to a certain page?
Example: Checkbox / Text: I have read and agree to the website Return Policy / Return Policy is a link. How can this be solved?You can follow the sample format given below while inserting the link as the Label of the field.
Text before the link <a href='URL that you want to link to' target='_blank'> Text to be displayed as Link</a>
Example:
In Label:
Click here to read <a href='http://themehigh.com/' target='_blank'> Return Policy</a>
- How to display 3 fields in a row?
You can display three fields in a row using custom CSS classes. Please refer to the below sample CSS classes and steps to align 3 fields in a row,
.form-row-25p-first{

width: 31.5%;

float: left;

margin-right: 2.5%;

}

.form-row-25p-last{

width: 31.5%;

float: right;

margin-right: 0;

}
Set class "form-row-25p-first" to the first 2 fields and set class "form-row-25p-last" to the 3rd field.
-
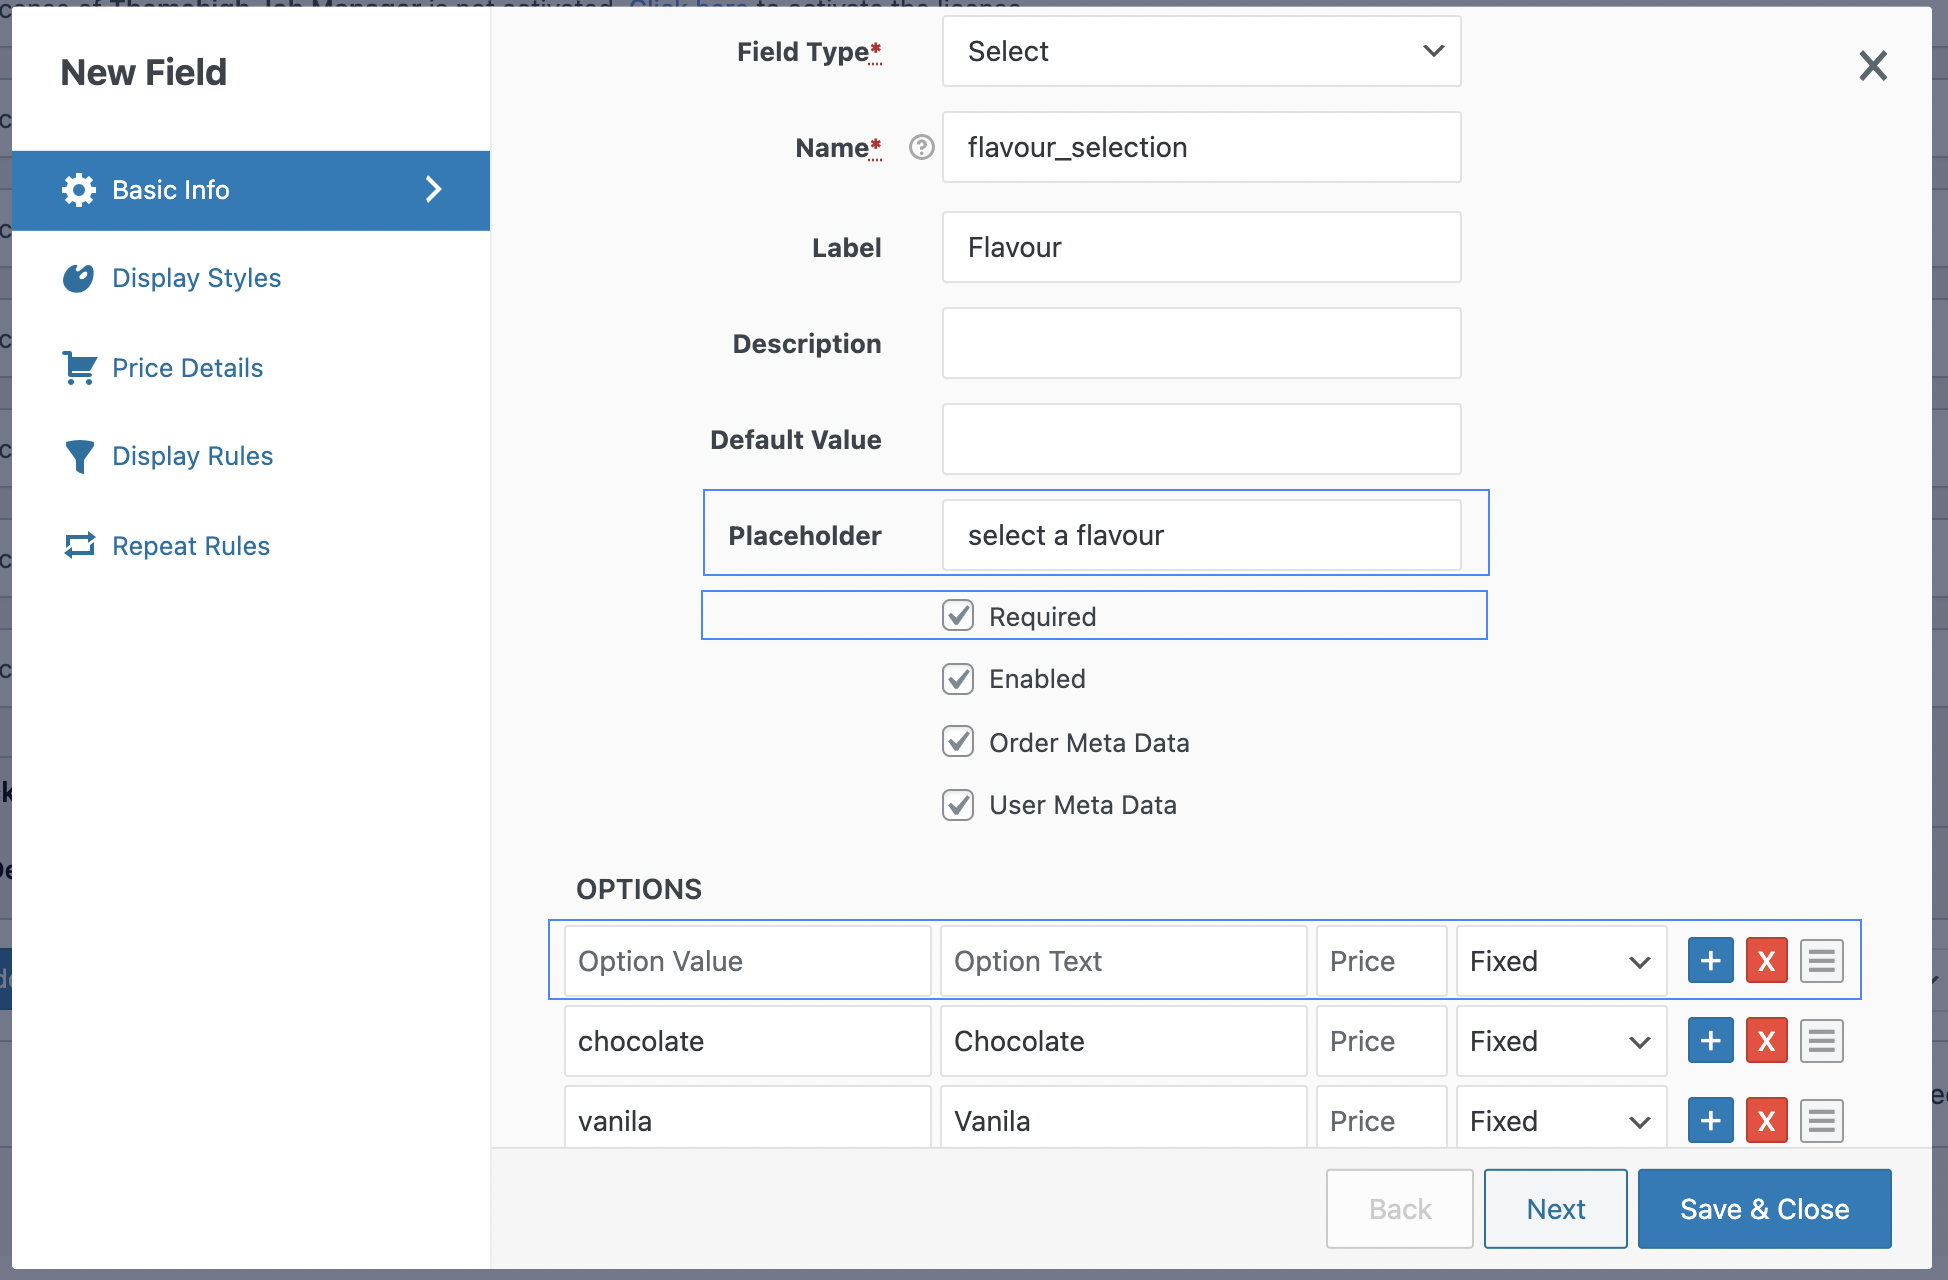
I created a select field, but the first option is always preselected. How can I show the placeholder (with no option selected), and force the user to select an option?
You can achieve your requirements by following the below steps.
1. Leave the first option blank (both Option Text and Option Value).
2. Provide a text in the Placeholder field(eg: Choose an option).
3. Mark the field as required.
-
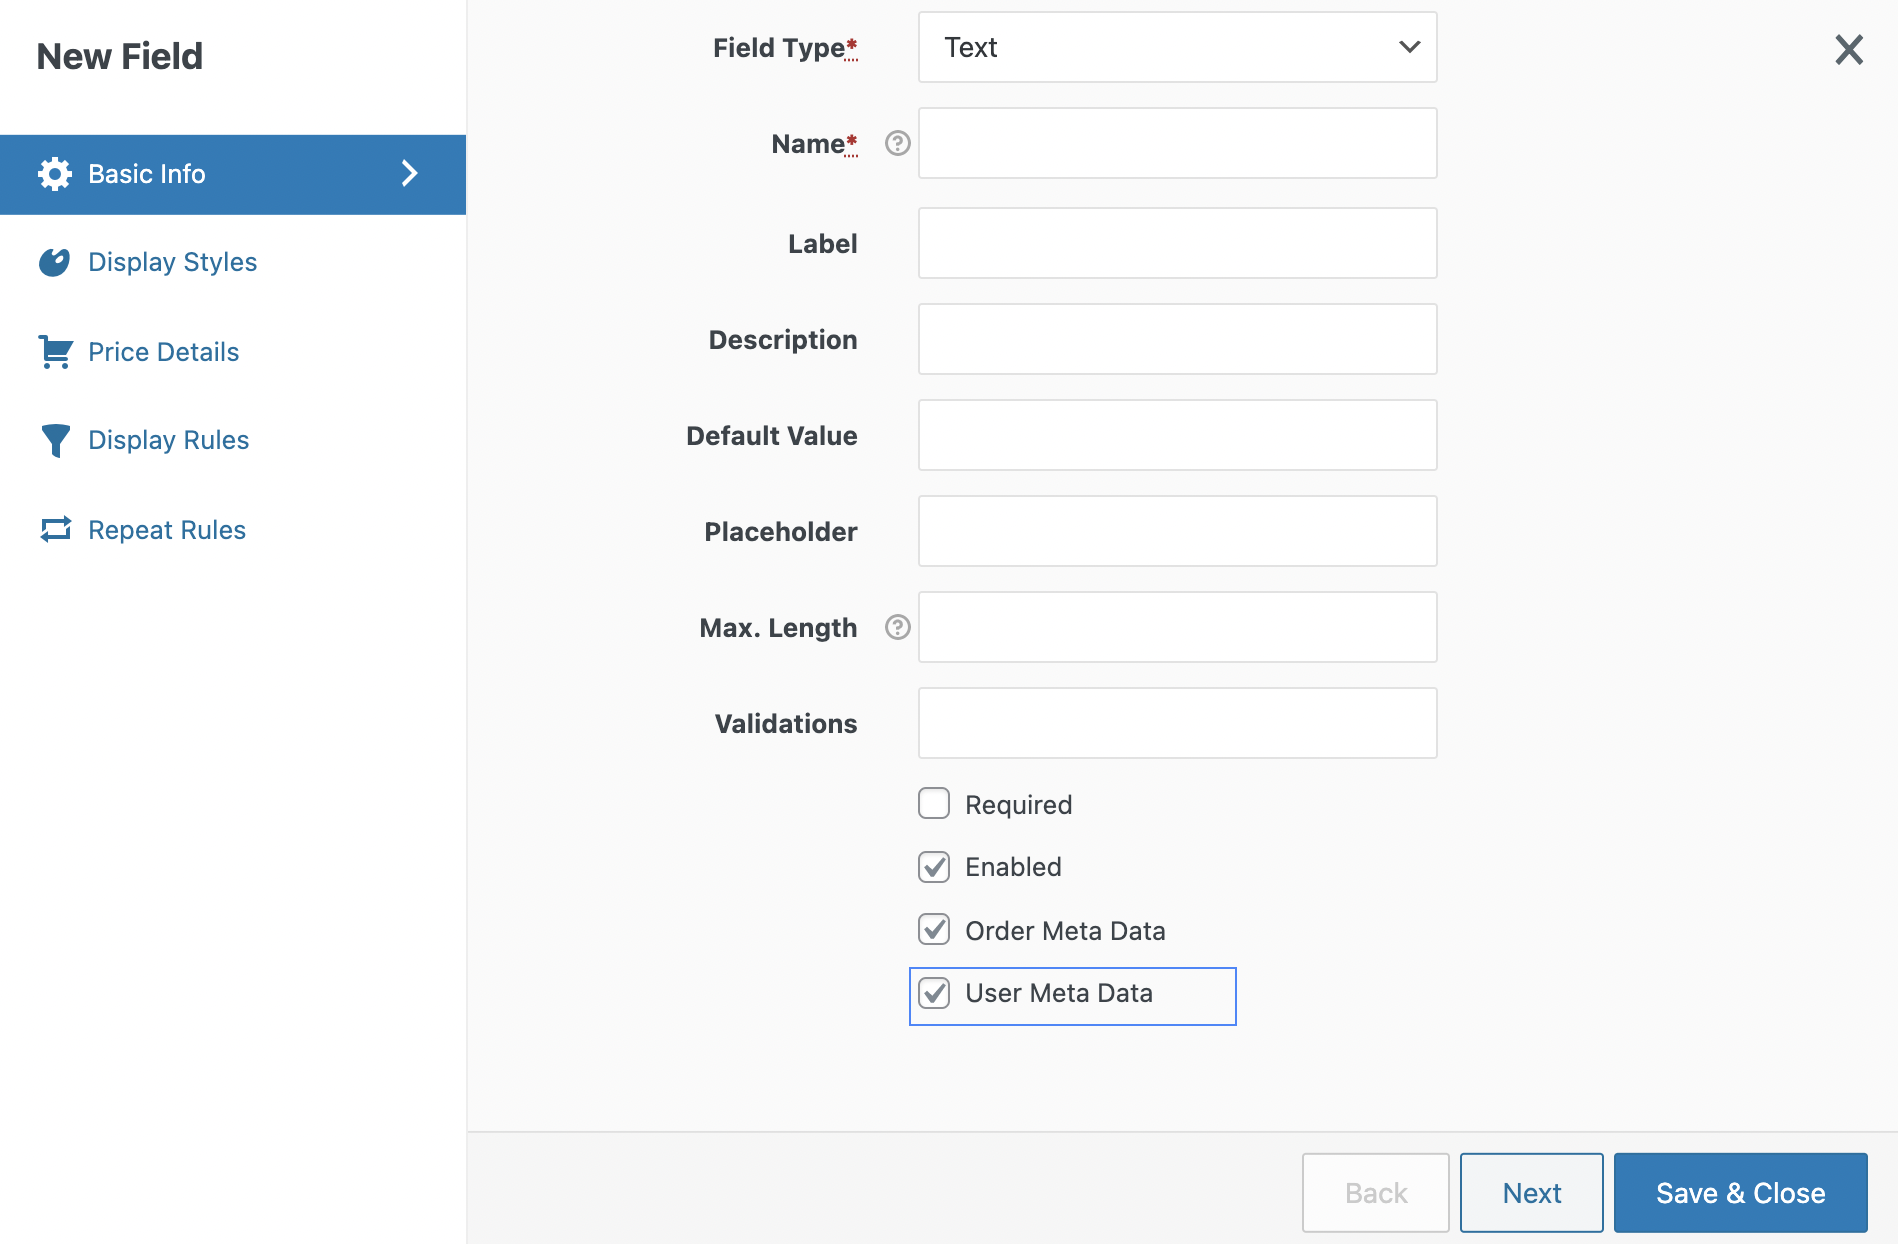
Can the checkout field editor put the information I want in the checkout to the user account as well?
In order to show the extra field created using our plugin to be displayed on the user profile page, please enable the option User Metadata for that field.

- Is it possible to include a custom field as part of the address display?
Yes, it is possible. You can display a custom field along with the address field using the feature Custom Address Fields in 'WooCommerce Checkout Field Editor Pro' plugin.
To learn more about 'Custom Address Fields' feature, please visit the documentation given in the below link:
Include Custom Address Fields in Address Display
You can also watch this video tutorial to learn about the feature: https://youtu.be/ggXI8ZpOnAE - Why do I get a 'Please enter an address to continue' message when I checkout?
You get this error when the country field is disabled/removed in either billing or shipping section of the plugin settings. When you provide validation for the state field or zip code field in any section, it is mandatory to have an active country field. But, there is an option for you to hide the country field if you don't feel like displaying it.
For this, you can create a new field in that particular section in the same name as billing_country/shipping_country. This will override any field which is existing in the same name. You can set the field type as hidden if you want to hide the field on the checkout page. You have to provide a country code as a Default Value so that the section will always consider the given country as default. For example, if you want to keep the United States of America as your default billing/shipping country, you can provide the code as 'US.’ - Why do I get an 'Internal Server Error' message when I checkout?
This happens when the country field is missing or disabled in a newly added section. When you provide validation for the state field or zip code field in any section, it is mandatory to have an active country field. As an example, if you are creating a new custom section, you should add a new field name {section-name}_country.
You can always hide the country field if you don't feel like displaying it. For this, you can give the field type of the country field as hidden, with a country code (for example, 'US' for the United States of America) provided as the default value. - Why does it show Chinese symbols in a date picker (calendar) field?
You can solve this by adding the below hook to your theme's functions.php file.
add_filter('thwcfe_include_jquery_ui_i18n', '__return_false'); - Why is it that I can’t edit some fields in a section in the plugin?
A field cannot be edited anymore once you add double quotes (") in any attributes of the field while adding or editing it. All you can do is delete the field or create a new field in the same name to override it. Make sure that no double quotes are added in any attributes. You can use single quotes instead of double-quotes. - Can the time slots of the Time picker be adjusted according to the date chosen?
This is possible with the Linked date feature. The time picker will display the time slots according to the chosen date of the linked Date Picker. If a day less than the current date is picked from the Date Picker, none of the time slots will be active to choose from. Similarly, while a day after the current date is picked from the Date Picker, all the time slots will be active.
To link the Timepicker field to the Date Picker field, follow the below step:
- Create a date picker field.
- Add/ Edit a time picker field.
- Enter all the required fields.
- Enter the field name of the date picker field in the Linked Date field.
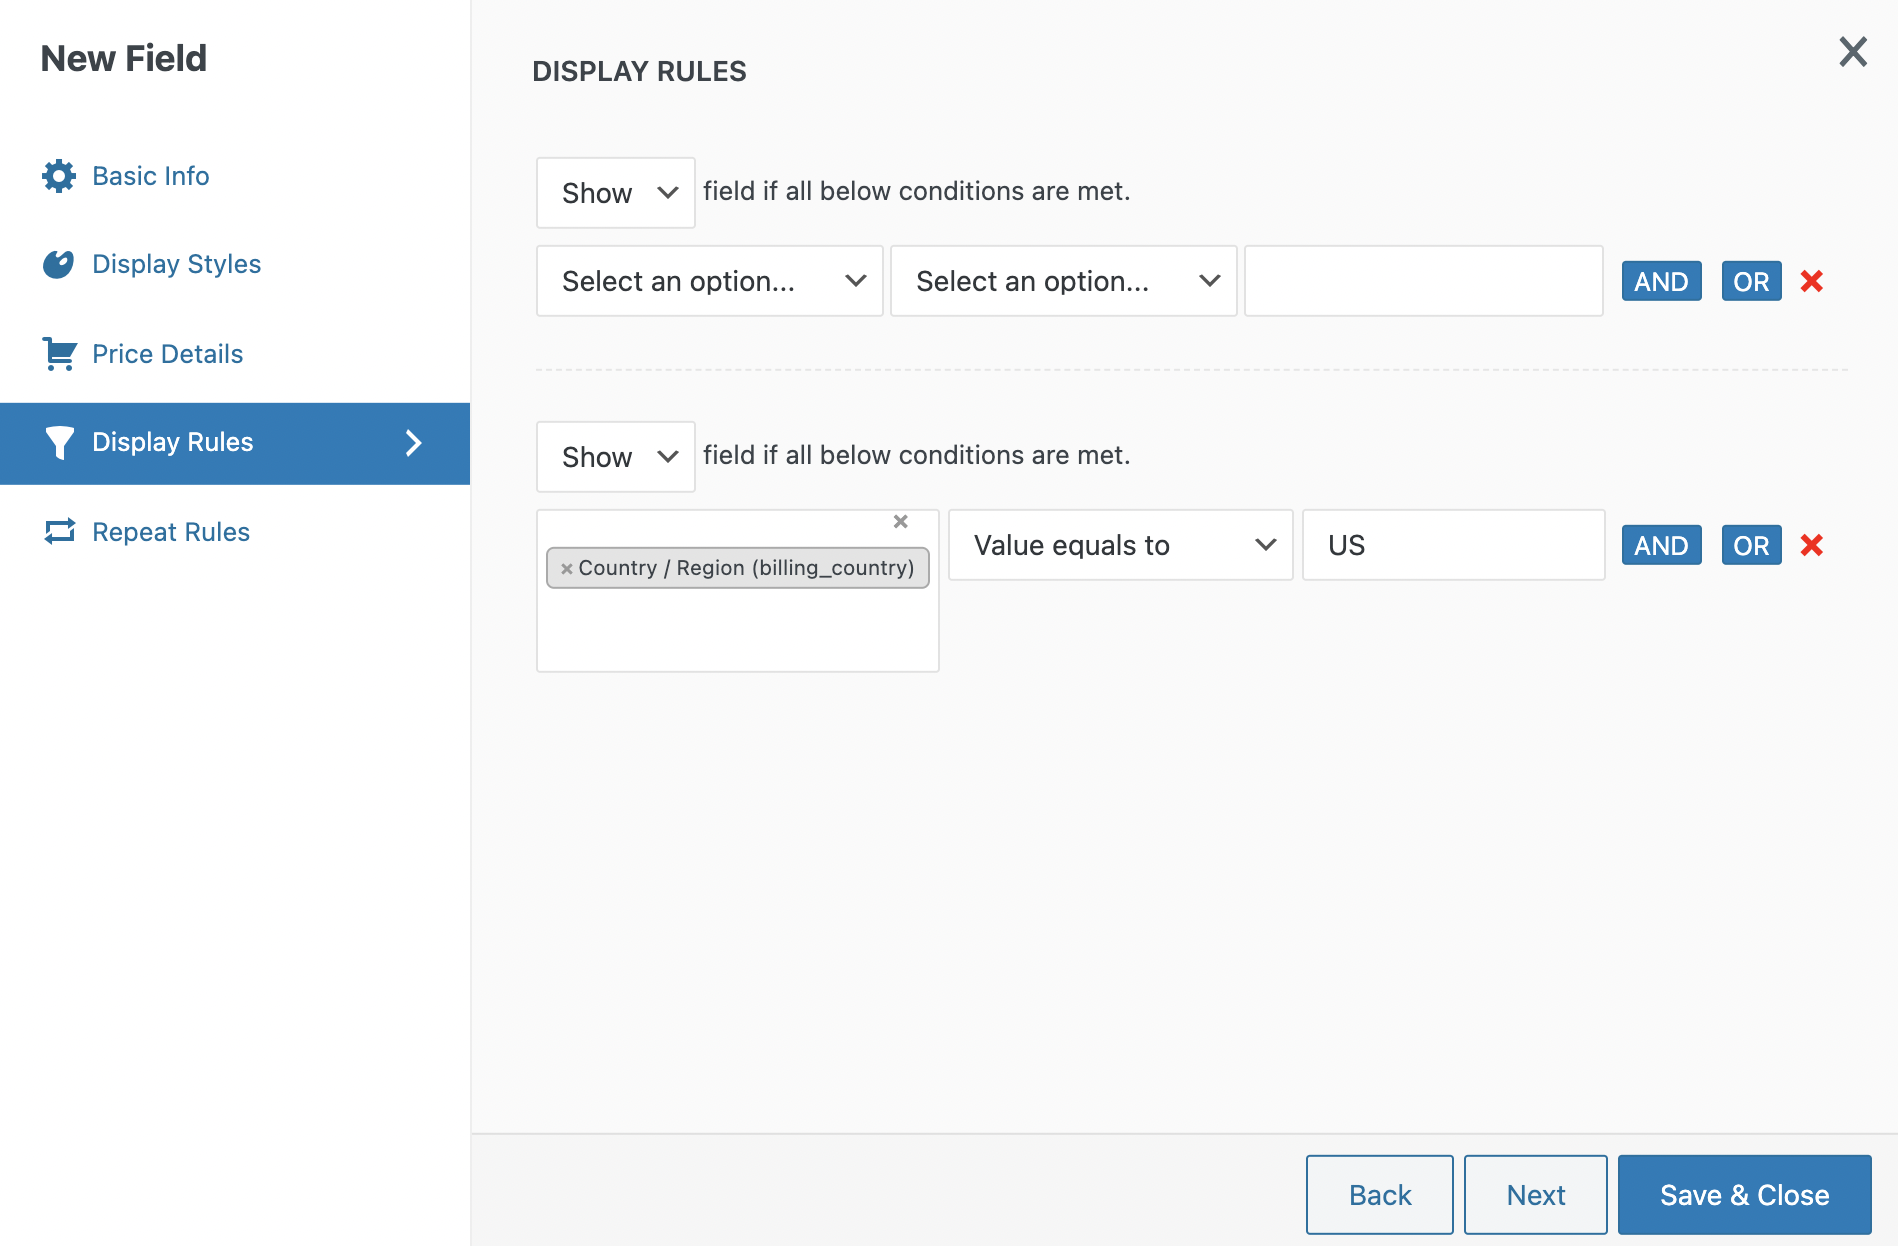
- Save the changes. - It is not working when I assign a conditional rule based on country.
That is because you have entered the full name of the country in the value box. Instead, you will have to add only the country code to make this work. For eg: the US for the United States of America.
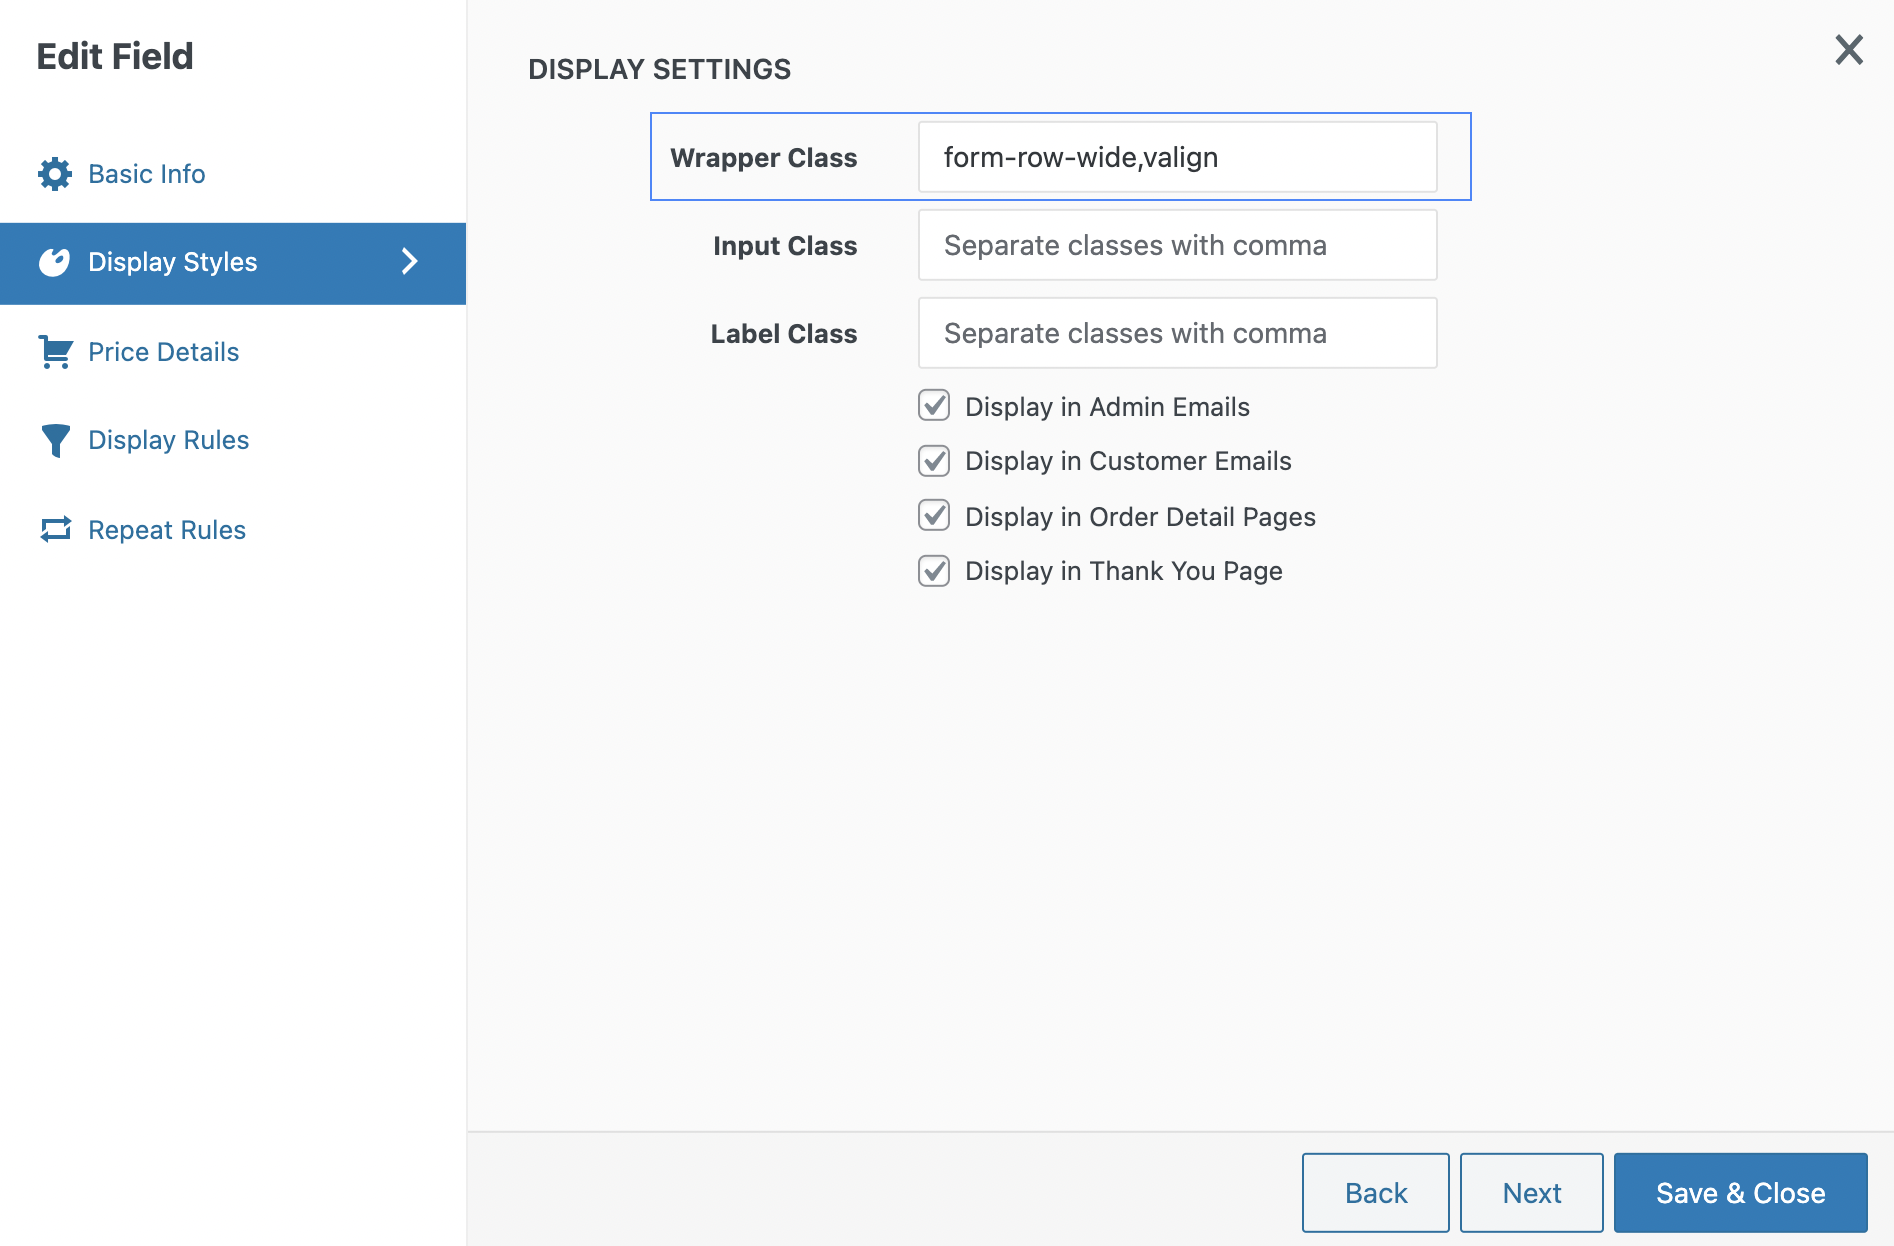
- How can I set vertical alignment for a Radio or Checkbox Group?
Create a new Radio or Checkbox Group field.
In the Wrapper Class field, add ‘valign’ separated by a comma.
Now, the field will be displayed as below

- Is the plugin compatible with WPML?
Yes, our premium version of the plugin is compatible with WPML. - How to translate the plugin text?
You can use the plugin WPML to translate the texts. To know more about using WPML, you can follow the below link:
https://wpml.org/documentation/getting-started-guide/theme-localization/
Alternatively, to translate any text missed out by WooCommerce, you need to create translation files (.mo files) for each language you want to use. You may use the POT file available in the plugin language folder to create the translation files(.po and .mo files). - Is there an option to restrict selecting today’s date from the date picker if it is 12:00 pm?
You can achieve this by adding the below code snippet in your child theme's functions.php file.
add_filter('thwcfe_min_date_date_picker_field_name', 'thwcfe_change_min_date');

function thwcfe_change_min_date($minDate){


  $currentDateTime  = current_time('H:i:s');

  $current_time     = strtotime($currentDateTime);

  $end_time       = strtotime('12:00:00');

  if($current_time > $end_time){

    $minDate = '+1d';

  }else{

    $minDate = '0d';

  }


  return $minDate;

}
Please replace field_name in the above code with your corresponding field name.
- How to change the billing section name?
You can achieve this by adding the below hook in your child theme's functions.php file.
function wc_billing_field_strings( $translated_text, $text, $domain ) {

switch ( $translated_text ) {

case 'Billing details' :

 $translated_text = __( 'New_Section_Name', 'woocommerce' );

break;

}

return $translated_text;

}

add_filter( 'gettext', 'wc_billing_field_strings', 20, 3 );
Please replace the New_Section_Name with your section name.
- Is there an option to send the order email to an additional email address?
You can achieve your requirement by creating an additional email field using our plugin. Then you can add the below code in your child theme's functions.php file in order to send the order email to the additional email address.
add_filter('woocommerce_email_recipient_new_order', 'additional_email_checkout', 10, 2);

function additional_email_checkout($emails, $object){

$aditional_email = get_post_meta($object->id, 'your_field_name', true);

if($aditional_email){

$emails .= ','.$aditional_email;

}

return $emails;

}
Replace your_field_name with your additional email field name.
- How to remove the price displayed along with the options of the select field.
Please add the below filters in your child theme's functions.php file in order to remove the price displayed along with the options of the select field.
add_filter('thwcfe_display_field_option_price', '__return_false'); - Is there a way to restrict entering negative numbers in the number field ?
You can try adding the below filter in the functions.php file in order to restrict the negative value in a number field.
add_filter('woocommerce_form_field_args', 'thwcfe_add_additional_attr', 10, 3);

function thwcfe_add_additional_attr($args, $key, $value){

if($key == 'field_name'){

if(isset($args['custom_attributes'])){

$args['custom_attributes']['min'] = '0';

$args['custom_attributes']['oninput'] = 'this.value = Math.abs(this.value)';


}

}


return $args;

}
Please replace the field_name in the above code with the name of your number field.
- I've created a file upload field, where do I find the files?
Please be informed that the uploaded file will be displayed as a clickable link in the Thank You page, Order Details page, and so on. So you can view the uploaded file by just clicking on the image link, which will open in a new window. For this, you need to enable the option "Display in Thank You Page" Display in Order Detail Pages" and so on inside the field's Display Styles tab.
- Is it possible to make a field required and not required based on some conditions?
Unfortunately, it is not possible to make a field required and not required based on the conditional rule. However, you can create two fields and set one as required and the other as not required and can conditionally show these fields using the Display Rule feature.
- How can I upload bulk options in a select field?
You can upload bulk options to the select fields by adding the below code in your child theme's functions.php file.
function prepare_field_options($options, $field_name){

 if($field_name === 'your_field_name'){

   //prepare field options

   $options['option1'] = array('key'=>'option1','text'=>'Test1','price'=>'','price_type'=>'');

   $options['option2'] = array('key'=>'option2','text'=>'Test2','price'=>'','price_type'=>'');

   $options['option3'] = array('key'=>'option3','text'=>'Test3','price'=>'','price_type'=>'');

 }

 return $options;

}

add_filter('thwcfe_field_options','prepare_field_options', 2, 10);
You need to replace your_field_name in the above code with your corresponding field name.
Please note that this is a basic implementation. You need to pass this to your developer in order to make the changes to the code as per your requirement.
- How to export Custom fields created using Checkout Field Editor plugin?
In our plugin, there is no inbuilt import/export feature. However, the premium version of our plugin is compatible with the below export plugins.
- WooCommerce Customer / Order / Coupon Export (by SkyVerge)
Please refer to the below link which will guide you to export custom fields using the above plugin.
https://themehigh.zendesk.com/hc/en-us/articles/900000858643-Include-Custom-Fields-in-CSV-Export
- Advanced Order Export For WooCommerce(by AlgolPlus).
You can follow the below steps in order to export custom fields created in our plugin using the above plugin.
1. Create custom fields and place an order from your shop.
- Navigate to the corresponding plugin settings Export orders tab under WooCommerce.
- Select the Setup fields to export option from the plugin settings tab.
- Click on the Add field
- From the meta key drop-down select the name of the corresponding custom field and provide a proper column name (the name which you like to display as a heading in excel)
- Click on the Confirm option.
- Drag the field to the left column.
- Save the settings and export the order.
Further, while exporting fields (like date picker) we request you open the downloaded file using Google sheet.
You can use any of the above plugins to export the fields.
-
How can I retrieve the value of the custom field ?
The fields created using our plugin are saved in the wp_postmeta table. You can retrieve the value of the custom field from the database by using the below function.
For order metadata, you can use the below function:
$order_meta = get_post_meta( $order_id, $field_name, true );Where $order_id is the id of the order.
If you configure the field as User metadata (it is a feature in our plugin) then those fields are saved in the wp_usermeta table. You can retrieve the value from the database by using the below function.
$user_meta = get_user_meta( $user_id, $field_name, true );
Comments
0 comments
Please sign in to leave a comment.