Basic Setup (Mandatory) for License Management
For the Woocommerce License Manager from ThemeHigh to function on your WooCommerce Store, you will need to do the following modifications :
- In your Licensed Product-Instantiate License manager function in the licensed plugin file.
- In your Woocommerce Store-Configure License Related details for Products and Product Variations.
These steps are mandatory for your store to communicate with the products on your client sites for regular checks and validation of the product licenses.
Modifications to be done in Licensed Product File
Download and Configure the Client Php File
- Download the Client PHP file [class-license-manager.php] from Downloads section.
- Copy the Client file to the Plugin Root folder (to be licensed).
- Open the copied class-license-manager.php file.
- Rename the Class TH_License_Manager at 2 instances to the name you would like to use with your plugin. (The class name must be unique for each Licensed Product)
- Instance 1 → if(!class_exists (' Your_Unique_Class_Name ')):
- Instance 2 → class Your_Unique_Class_Name.
- Instantiates the renamed function in the licensed plugin file. Below you can find the sample code:
function init_license_manager(){ if ( !class_exists( "TH_License_Manager" ) ) { $api_url = "http://yourserver.com/"; require_once( plugin_dir_path( __FILE__ ) . "class-license-manager.php" ); TH_License_Manager::instance( __FILE__, $api_url, "plugin" ); } } init_license_manager(); - Update the http://yourserver.com/ with your store URL.
- Rename the Class name TH_License_Manager with the class name (Your_Unique_Class_Name) defined in the Client PHP file.
- Save the file.
function init_license_manager() {
if ( !class_exists( "TH_License_Manager" ) ) {
$api_url = "http://yourserver.com/";
require_once( plugin_dir_path( __FILE__ ) . "class-license-manager.php" );
TH_License_Manager::instance( __FILE__, $api_url, "plugin", "Software Identifier" );
}
}
init_license_manager();
Add a link to the License Activation Message
In case if the license is not activated, a message “License not activated. Click here to activate” will be displayed in the admin page. You can add the required link to “Click here” in the message, which upon clicking takes you to the page from where you can activate the same.
To do so,
- Copy the below-given code snippet to the Licensed Product file.
function thnp_license_page_url( $url, $prefix ) { $url = "admin.php?page=thnp_license"; return admin_url( $url ); } add_filter("thlm_license_page_url_new_plugin", "thnp_license_page_url", 10, 2); - Replace the $url value with the URL of the tab where license settings are placed.
- Replace new_plugin in the filter (thlm_license_page_url_new_plugin) with the software title. (In the Software title, Change all the Capital letters to small letters and replace spaces with Underscores).
- Save.
To Display "Find out how to get your license key" message in Licensed Products
- Copy the below-given code snippet to the Licensed Product file
function thnp_license_form_title_note( $title_note ){ $help_doc_url = 'https://www.themehigh.com/help-guides/'; $title_note = 'Find out how to get your license key .'; $title_note = sprintf($title_note, $help_doc_url); return $title_note; } add_filter("thlm_license_form_title_note_new_plugin", "thnp_license_form_title_note"); - Replace the URL https://www.themehigh.com/help-guides/ in the above code snippet with suitable redirection URL to your Help doc.
- Modify the text in the href tag as per your choice of the display message.
- Replace new_plugin in the filter with the software title (In the Software title, Change all the Capital letters to small letters and replace spaces with Underscores).
- Save
After performing the above steps, Install & activate your plugin on your site. You can find the License Settings under WordPress Settings.
Display position of License Activation Form in Licensed Products
When the initial set up is done, you will be able to find the License Settings tab under WordPress Settings. To decide a display position other than WordPress Settings, follow the given steps :
- Open the Licensed Plugin file.
- Copy the below-shown short-code to the plugin file where the License settings must be displayed
echo do_shortcode(‘[licensepage-new-plugin]’);
- Edit the shortcut and replace “new-plugin” with the plugin Identifier.
- Save the Changes.
- Now if you wish to avoid the Settings being displayed under WordPress Settings, please follow the below steps:
To Remove the License Settings from WordPress Settings
Add the below-shown filter to your licensed plugin file
add_filter('thlm_enable_default_license_page', '__return_false');
The license settings of the plugin will be displayed only on the page where you have used the short-code.
Woocommerce Store - Configure License Related details for Products and Product Variations
License Manager for Woocommerce comes with the license management for Simple and Variable Products as well. To configure and manage license systematically, you need to add relevant information on the Product Page in two sections:
- Expiry and Activation Limit Details
- License Settings Information
Expiry and Activation Limit settings:
Go to Products → All Products → Edit the Simple/Variable product.
a) Manage Simple Product
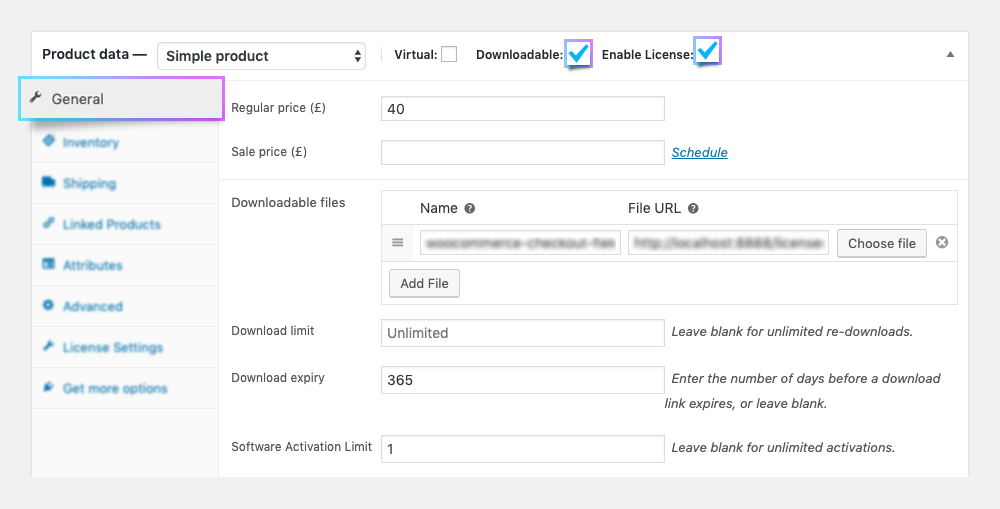
- Enable the check-boxes Downloadable and Enable License.
- Under the General tab for the product, fill the following details with respect to the downloadable Licensed Product:
- Downloadable files - Add the ZIP File of the plugin for which the license settings are applied as mentioned in the topic Modifications on Licensed Product File.
- Download Limit - Maximum number of downloads possible for a key. If you do not want to impose a limit for the downloads just leave this blank for unlimited downloads. (This is a default feature of WooCommerce downloadable product which is not often used)
- Download expiry - You can enter the number of days after which the download link expires or leave blank if you do not want to set an expiry. The Download expiry will function as the expiry of the License key as well.
- Software Activation Limit - You can choose the number of sites for the software license to be activated. If you do not want to set a limit, just leave this blank for unlimited activations.
- Click on the Update button after making the necessary changes.

b) Manage Variable Product
- Go to Products → All Products.
- Click on Add Product/Edit a Variable product
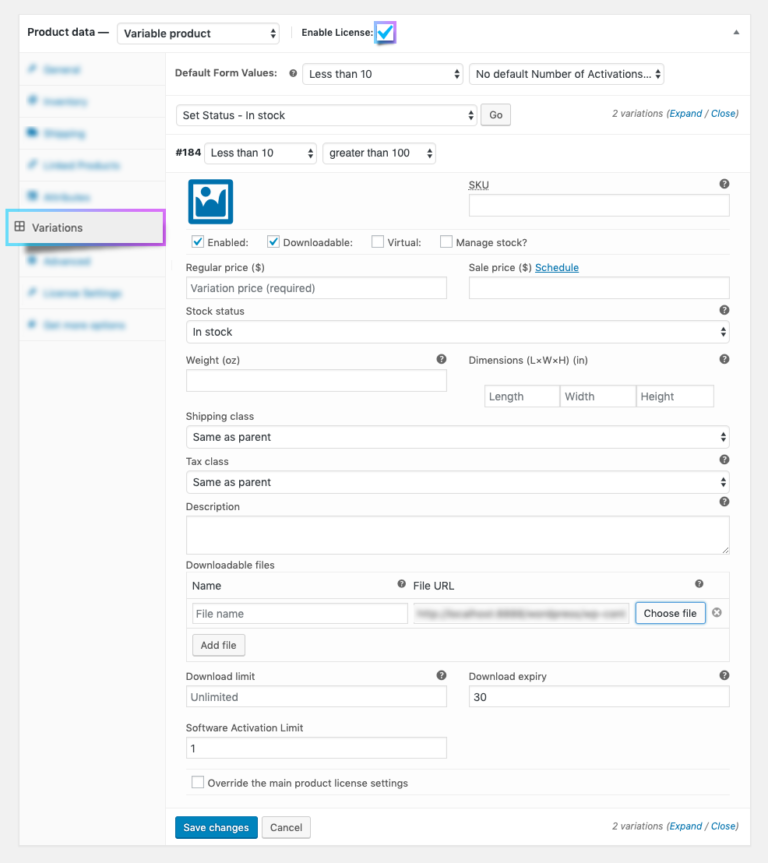
- Enable the Enable License Checkbox.
- Navigate to the Variations tab, where you can find all the variations available for the product. If no variations are available, create it from the Attribute as per your requirement.
- Select the Variation and Enable the check-box Downloadable. Fill the rest of the required fields.
- Downloadable files - Add the ZIP File of the plugin for which the license settings are applied as mentioned in the topic.
- Download Limit - Maximum number of downloads possible for a key. If you do not want to impose a limit for the downloads just leave this blank for unlimited downloads. (This is a default feature of WooCommerce downloadable product which is not often used)
- Download expiry - You can enter the number of days after which the download link expires or leave blank if you do not want to set an expiry. The Download expiry will function as the expiry of the License key.
- Software Activation Limit - You can choose the number of sites for the software license to be activated. If you do not want to impose a limit, just leave this blank for unlimited activations.
- Click on Save changes button after making necessary changes.
- Update to confirm the changes made for the Product.

License Settings Information for Product:
Using the License Manager for WooCommerce plugin, you can add software license details into your Products and Product variations.
- Go to Dashboard⟶Products⟶All Products
- Select the product which you want to edit.
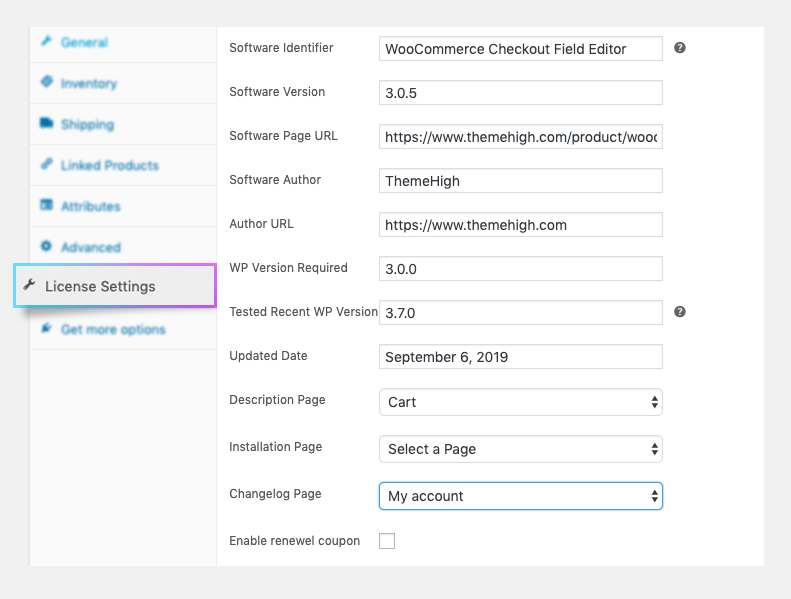
- In the Product Details page, Navigate to Product Data Section⟶ License Settings tab. Fill in the required fields.

Following are the fields available in the License settings tab of the product, which would help:
- Software Identifier: The field name to identify the product. The system identifies the Plugin Name as Software identifier. This is the unique identifier for the product in store.
- Software Version: The current version number of your product. The version number should be the same as provided in the plugin file.
- Software Page URL: The URL of your current product page.
- Software Author: The Author details of your product.
- Author URL: The URL of the author page.
- WP Version required: The minimum version of WordPress required for the product to run. If the version required and the current version of the client site are different, then display a message, ‘Your current WordPress version is x.x.x. The required WordPress version is y.y.y or later’, while an update is available at WordPress.
- Tested Recent WP version: The latest version of WordPress that is tested & compatible with the software.
- Updated Date:The date of the latest update of your product.
- Description Page: Select from the drop-down list (which populates the pages in your website) the page that corresponds to your plugin details.
- Installation Page: Select from the drop-down list (which populates the pages in your website) the page with details to the installation of your product.
- Changelog Page: Select from the drop-down list (which populates the pages in your website) the Changelog respective to your plugin.
- Enable renewal coupon: Enabling this would generate a coupon and will be shared with the user along with the License validity expiry reminder.
Click on the Update after entering relevant data.
Override the Product License Settings for each Product Variations
- Go to Products → All Products → Edit.
- Navigate to the Variations tab.
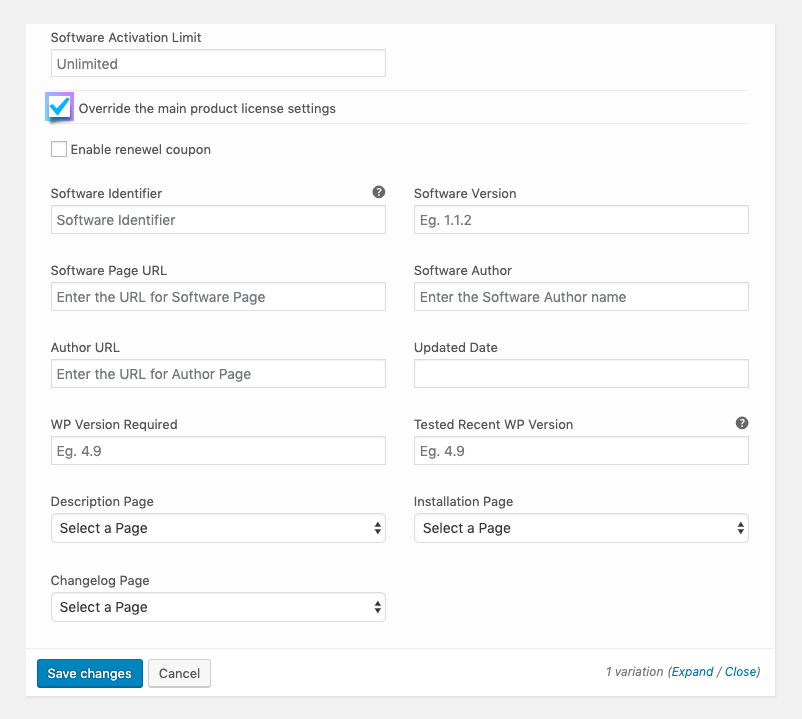
- Select the Variation that needs to override the Main Product License Settings.
- Enable the checkbox Override Global License Settings.
- New fields to override the Main Product License will be provided, fill in the details for the corresponding fields that apply to this Variation.
- Software Identifier
- Software Version
- Software Page URL
- Software Author
- Author URL
- WP Version Required
- Tested Recent WP Version
- Updated Date
- Description Page
- Installation Page
- Changelog Page
- Click on the Save Changes button after making all necessary changes.
- Update the Product to confirm changes.

Comments
0 comments
Article is closed for comments.