In This Article:
- Configure Delivery Availability
- To configure the Delivery Availability, under General Settings
- To configure the Delivery Availability, under Individual Settings
- Time Range Picker, Under General Settings
- Time Range Picker, Under Individual Settings
- Configure from General Settings
- Configure from Individual Settings
- Revert the Plan Delivery Settings to Global Settings from Product
Configure Delivery Availability
The delivery availability can be configured in 2 different methods: Using the General Settings in the plugin setting or from the Individual Settings in the Add/Edit Product page.
Once the General Settings is configured, it will be available for every schedulable product instead of repeating the availability configuration process. If in case a particular product has a different availability, this can be configured using the Individual Settings within each Product Page. The Schedule Delivery plugin feature can be added to both the simple and variable products.
To configure the Delivery Availability, under General Settings:
- Go to Dashboard → Products → Plan Delivery → General Settings → Calendar Settings.
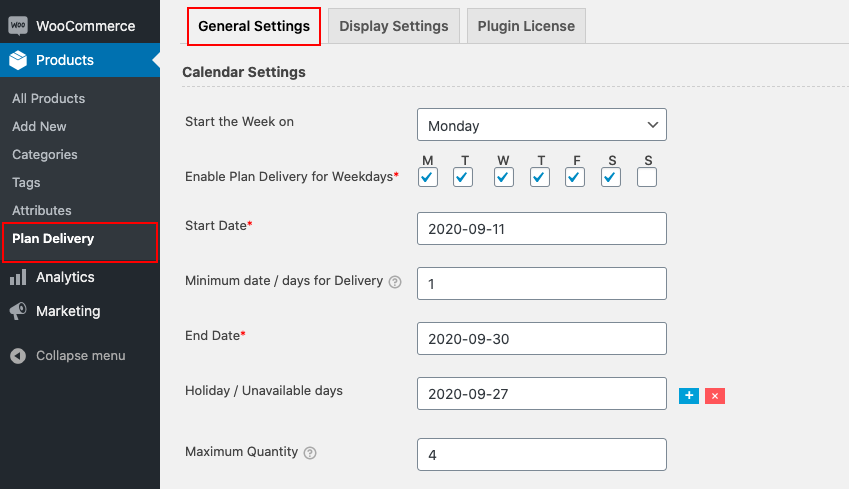
- You can configure the delivery availability using the following fields:
-
- Start the Week on: Define the starting day of the week in a monthly calendar displayed for the Schedule Products.
- Enable Plan Delivery for Weekdays: Select the days of the week for which delivery is available.
- Start Date: Date from which the products are available for delivery.
- Minimum Date/Days for Delivery: Set a minimum number of dates/days required for delivery of an order. This field will help if it requires a preparation time after receiving the order.
- End Date: Max.date up to which the schedule products are available for delivery.
- Holiday/Unavailable Days: Set unavailability on the calendar for the days when delivery is not available. Click the plus button ( + ) to add more holiday entries and delete the holiday by using the close button( X ).
- Maximum Quantity: Set the maximum quantity of products that can be scheduled for a date.
- Start the Week on: Define the starting day of the week in a monthly calendar displayed for the Schedule Products.
-
- Click on the “Save Changes” button to confirm the changes.
To configure the Delivery Availability, under Individual Settings:
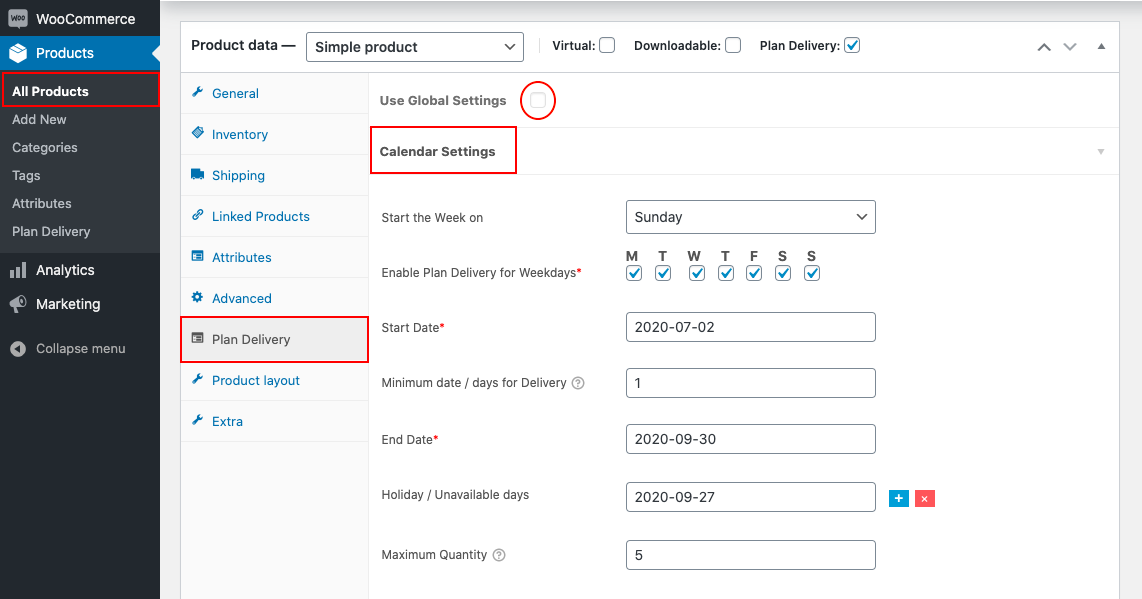
- Go to Products → All Products → Edit the Simple Product
- Enable the checkbox Plan Delivery.
- Navigate to the Plan Delivery menu under the Product Data tab. To use the Individual Settings, uncheck the checkbox ‘Use Global Settings’.
- Select the Calendar Settings section. Fill in relevant data for the particular product:
- Start the Week on
- Enable Plan Delivery for Weekdays
- Start Date
- Minimum Date/days for Delivery
- End Date
- Holiday/Unavailable Days
- Maximum Quantity
- Click on the “Save Changes” button to confirm the changes.
Time Range Picker, Under General Settings
The Time Range Picker of the plugin helps the customers to choose an apt time for their product delivery. Similarly, the store owners can define the available time slots for the delivery of the product.
To enable the Time Range Picker:
- Navigate to Dashboard > All Products > Plan Delivery > General Settings > Time Range Picker Settings.
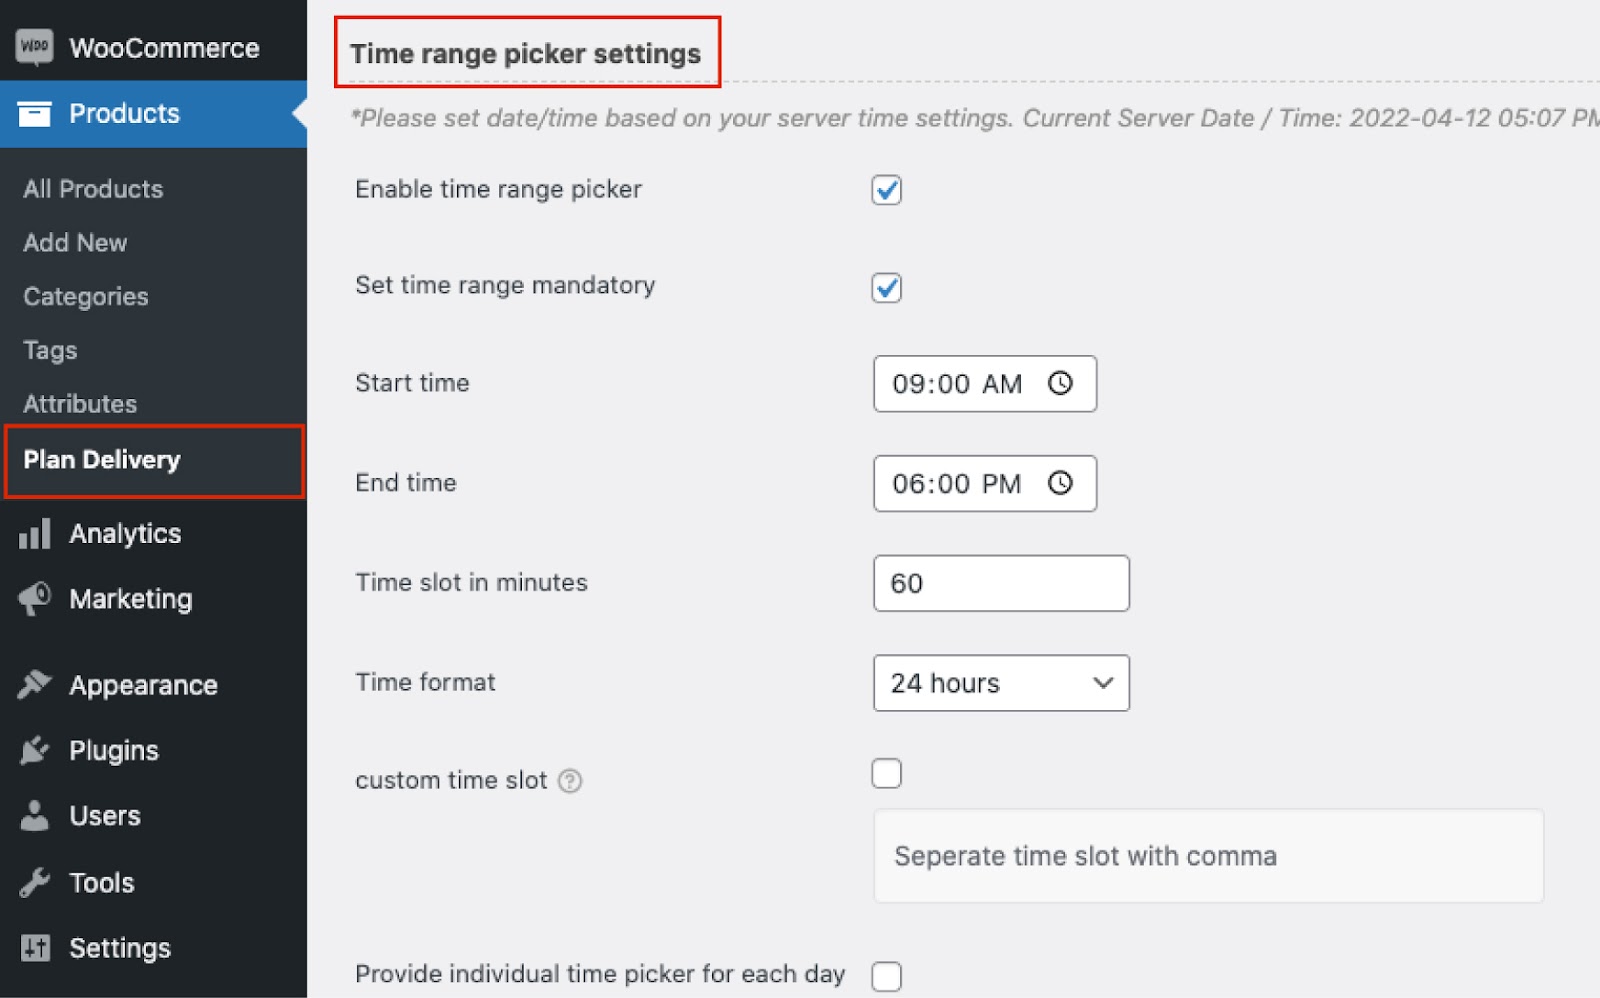
- Once you enable the Enable time range picker option, configure the following settings.
-
- Set time range mandatory: Enable the checkbox to keep the time range as a mandatory option while ordering a product.
- Start time: Choose the start time for the product delivery from the clock displayed in the field.
- End time: Maximum time up to which you can deliver the product to the customers.
- Time slot in minutes: Enter the duration of the slot of time. If the time slot duration is 60 minutes, then it will look like this.

- Time Format: Choose the specific time format from the corresponding drop-down.
- Custom Time Slot: Set custom time slots manually, in a 24hours format.
- Provide individual time picker for each day: Enable the checkbox to display time picker for each day in the calendar.
- Set time range mandatory: Enable the checkbox to keep the time range as a mandatory option while ordering a product.
-
-
Once the changes are done, click on the Save Changes button to save the changes.
Time Range Picker, Under Individual Settings
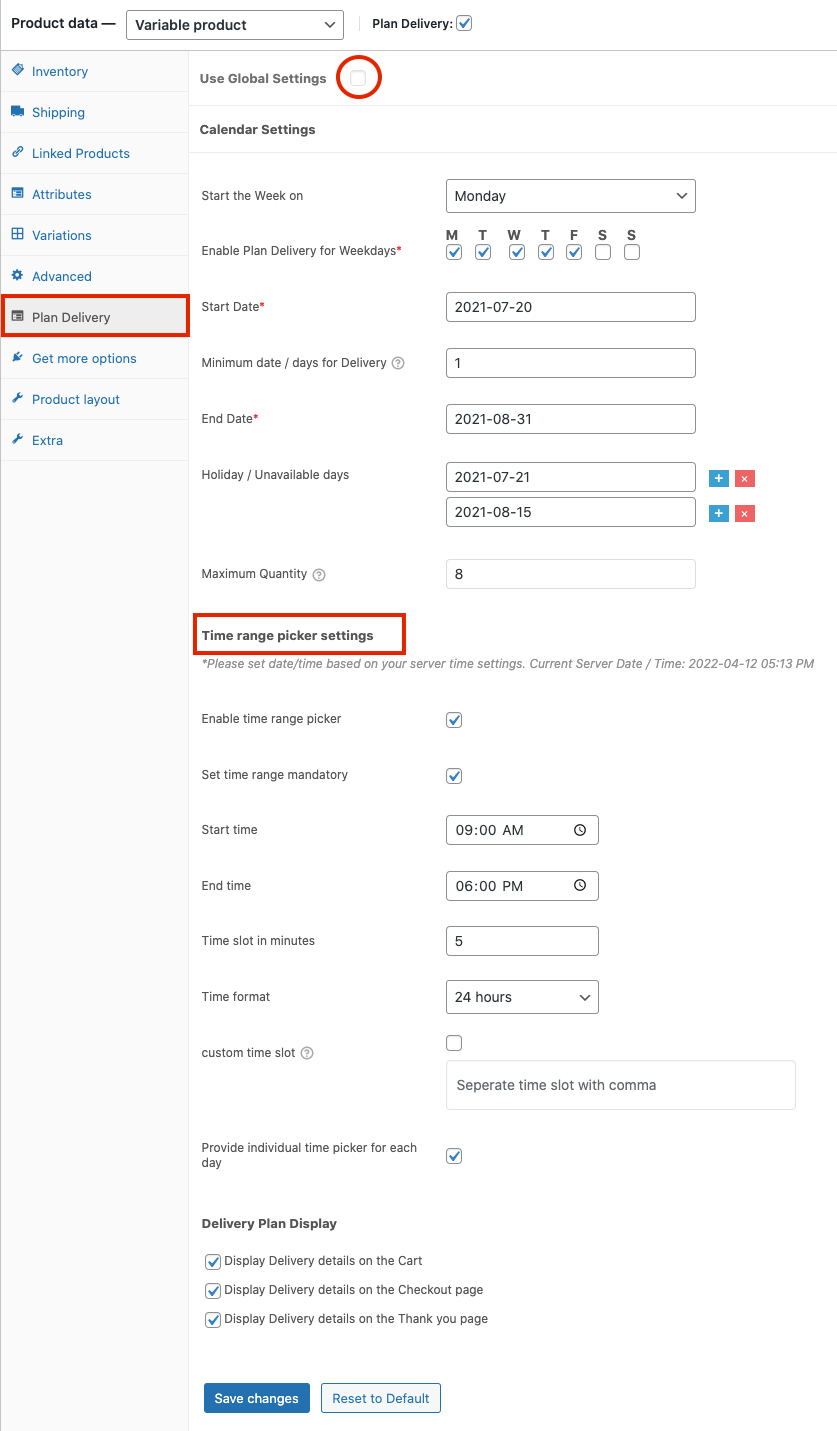
- Navigate to Products > All Products > Edit > Simple Product.
- From here, enable the Plan Delivery checkbox.
- Once Plan Delivery is enabled, select the Plan Delivery option below the Product Data Tab.
- To use the individual settings, uncheck the Use Global Gettings checkbox.
- Go to Calendar Settings > Time range picker settings.
Make the required changes by configuring the following settings.- Set time range mandatory
- Start time
- End time
- Time slot in minutes
- Time format
- Custom time slot
- Provide individual time picker for each day
- When all the changes are done, confirm the changes by clicking on the Save changes button.
Configure from General Settings

- Go to Products → Plan Delivery → General Settings → Delivery Plan Display.
- Enable or Disable the checkboxes:
- Display Delivery details on the Cart
- Display Delivery details on the Checkout page
- Display Delivery details on the Thank you page
Click on the “Save Changes” button to confirm the changes.
Configure from Individual Settings
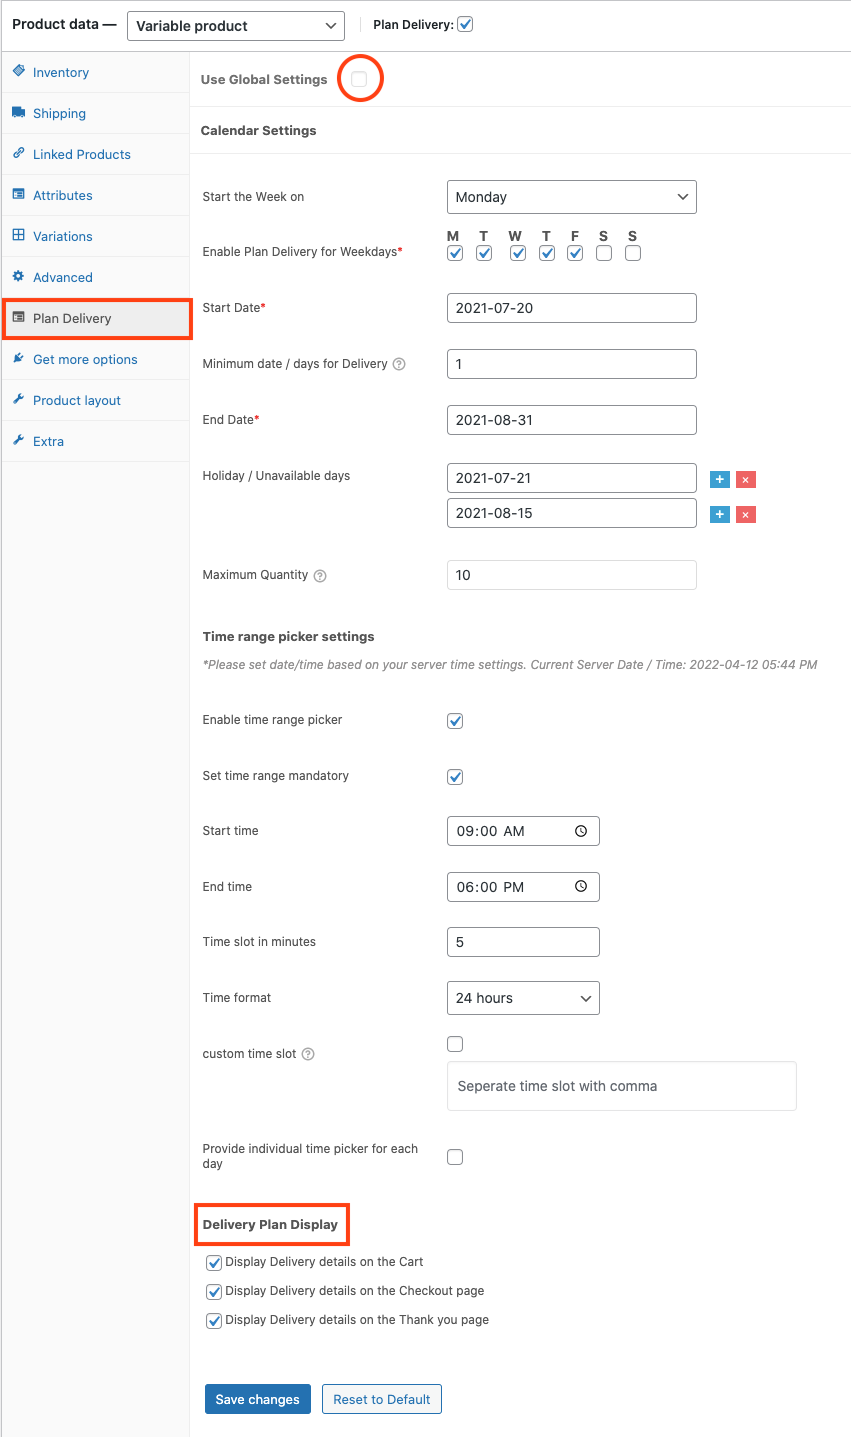
- Go to Products → All Products → Edit the Simple Product.
- Enable the checkbox Plan Delivery.
- Navigate to the Plan Delivery menu under the Product Data tab. Disable the checkbox ‘Use Global Settings’.
- Select the Calendar Settings section. Enable/Disable the checkboxes to display/hide the Plan delivery details at corresponding pages:
- Display Delivery details on the cart
- Display Delivery details on the Checkout page
- Display Delivery details on the Thank you page
Click on the “Save Changes” button to confirm the changes.
Revert the Plan Delivery Settings to Global Settings from Product
After setting individual settings for a product from Product, if in case the settings need to be reverted to the global settings, follow the below steps:
- Go to Products → All Products → Edit from a Simple Product.
- Navigate to the Plan Delivery menu under the Product Data tab.
- For the product where the Use Global settings checkbox is unchecked, Enable the checkbox again to use the Global Settings.
- Click on Update to confirm the changes made.
Comments
0 comments
Please sign in to leave a comment.